|
|
|
AT Commander’s The concept was a device that used a Tupperware lid as a
flocking chamber, screwed to a solid base.
Then a hardware store electrode. To that, I’d add the Negative Ion
Generator. At first, I wasn’t thinking
about storing the thing or about portability.
I was just thinking about how to make the device and how it worked. Refinements came later on. Finally, the 110V AC generators arrived. We wired one up to my Tupperware flocker on GIDefender’s kitchen
table with alligator clips, wire, and exposed danger everywhere, and applied
the power. It worked incredibly
well! This was the solution, no
doubt! Now we had to turn this
Tupperware proof of concept device into a real flocker
for GIDefender.
He’d already built the box and now we knew what to put in it, the
optimum distance between plate and electrode, and exactly what we needed. We ran to the big-box hardware store and
bought he necessary odds and ends, then headed back to
GIDefender’s to wire it up. Soon he was up and running with the device he
dubbed the “Flockmaster 2000!” SOURCES:
Flockmaster 2000-P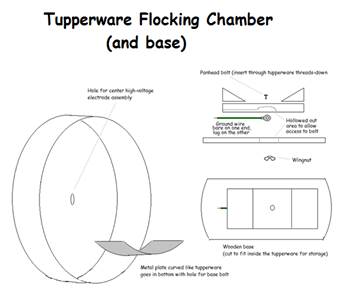 This
started out with a conversation with GIDEFENDER. He was looking for a way to flock Joe heads
that was more efficient than the flashlight-looking railroad grass device
(which broke soon after he started using it). He’d done some research online explaining how
the flocking was done and sources for flocking materials, and asked me to give
him a hand finding the right high voltage device and wiring it all up. Since I’d singed my eyebrows a time or two, I
figured I’d give it a go. He’s already
built the frame of the “flock box” and needed the “guts” to make it an
industrial-grade flocking machine.
This
started out with a conversation with GIDEFENDER. He was looking for a way to flock Joe heads
that was more efficient than the flashlight-looking railroad grass device
(which broke soon after he started using it). He’d done some research online explaining how
the flocking was done and sources for flocking materials, and asked me to give
him a hand finding the right high voltage device and wiring it all up. Since I’d singed my eyebrows a time or two, I
figured I’d give it a go. He’s already
built the frame of the “flock box” and needed the “guts” to make it an
industrial-grade flocking machine.
Unusually (for me), I made a plan.
Rather than do a lot of trial-and-error with the frame, I decided to
jury rig a “proof of concept” device with which to experiment until we knew
what we were doing; THEN we could build the final “production model” into his
heavy-duty flock box structure. I
decided the way to go was with a Tupperware-like cake carrier. This would be a PERFECT proof of concept
vehicle!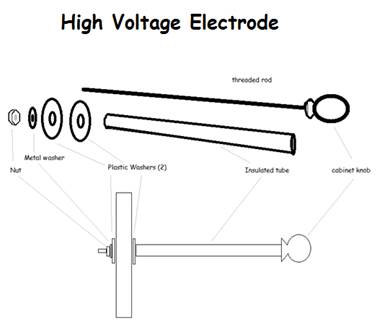 The
center electrode in the pic at right was made in a few steps. First I went to the lamp department of a
local big-box building store (Home Depot or Lowe’s, I forget which), and
selected the most perfectly round lamp finial I could. (A “lamp finial” is the goofy little thing
that you screw on top of a lamp shade to keep it on.) Then I went to the hardware section and found
a threaded rod that would fit it. The
threaded rod was maybe 2 feet long or more.
I just cut it off later at the length I wanted and gave the rest to GIDefender who used the rest – one threaded rod was enough
for 2 flockers, and we still had some left over. I picked up two bolts and washers that would
fit the threaded rod, so I could screw it into the base. Next, I went to the irrigation section of a
local hardware store and bought some plastic irrigation tubing that would slip
(tightly) over the threaded rod, and another length that would slide (tightly)
over the first layer of tubing. Now I
had a threaded rod with TWO layers of plastic irrigation tubing as insulators
(even though my plan, above right, only called for one).
The
center electrode in the pic at right was made in a few steps. First I went to the lamp department of a
local big-box building store (Home Depot or Lowe’s, I forget which), and
selected the most perfectly round lamp finial I could. (A “lamp finial” is the goofy little thing
that you screw on top of a lamp shade to keep it on.) Then I went to the hardware section and found
a threaded rod that would fit it. The
threaded rod was maybe 2 feet long or more.
I just cut it off later at the length I wanted and gave the rest to GIDefender who used the rest – one threaded rod was enough
for 2 flockers, and we still had some left over. I picked up two bolts and washers that would
fit the threaded rod, so I could screw it into the base. Next, I went to the irrigation section of a
local hardware store and bought some plastic irrigation tubing that would slip
(tightly) over the threaded rod, and another length that would slide (tightly)
over the first layer of tubing. Now I
had a threaded rod with TWO layers of plastic irrigation tubing as insulators
(even though my plan, above right, only called for one).  The
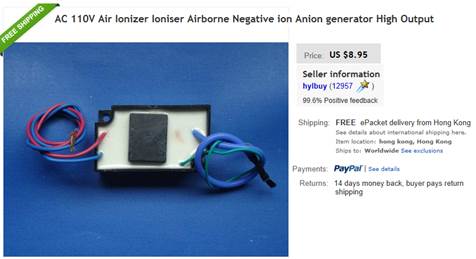
Negative Ion Generator would be an Ebay device,
probably from China. It’d be boxed up
for safety, grounded, and would operate off of 12 volts (because it’s less
scary to work with than household current).
The generator would connect to the flocking device with alligator clips,
for ease of testing. This was, after
all, only a proof of concept device and not really intended to be a durable
item that’d last long or be robust in any way.
Note, this is NOT the device I ended up using… the 110 volt AC unit was
much better!
The
Negative Ion Generator would be an Ebay device,
probably from China. It’d be boxed up
for safety, grounded, and would operate off of 12 volts (because it’s less
scary to work with than household current).
The generator would connect to the flocking device with alligator clips,
for ease of testing. This was, after
all, only a proof of concept device and not really intended to be a durable
item that’d last long or be robust in any way.
Note, this is NOT the device I ended up using… the 110 volt AC unit was
much better!
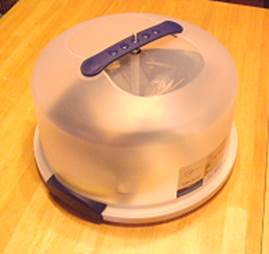
 When
finished, I envisioned the device to look something like this (at right). When ready for use, it’d resemble a table fan
more than anything else. So long as it
worked. After I started looking around
for a Tupperware-like cake carrier (not originally my idea, by the way…
someone, somewhere online had used a cake carrier lid and I thought it was a
quick/easy solution). Finally I found a
cake carrier lid at Wal-Mart and after handling it, I immediately knew my plan
was FAR more complicated than necessary.
It’d be MUCH simpler just to bolt the lid to the base with a nylon bolt
and be done with it!
When
finished, I envisioned the device to look something like this (at right). When ready for use, it’d resemble a table fan
more than anything else. So long as it
worked. After I started looking around
for a Tupperware-like cake carrier (not originally my idea, by the way…
someone, somewhere online had used a cake carrier lid and I thought it was a
quick/easy solution). Finally I found a
cake carrier lid at Wal-Mart and after handling it, I immediately knew my plan
was FAR more complicated than necessary.
It’d be MUCH simpler just to bolt the lid to the base with a nylon bolt
and be done with it!

 The
initial solution was not satisfactory, unfortunately. I ordered two 12VDC Negative Ion Generators
on Ebay from “bellevue2046” in China. They were advertised as some goofy kind of
“Anion” generator. I have no Earthly
idea why someone from China would think these have anything to do with onions,
but no matter – it was just what we were needed. After they arrived, I took my Tupperware
device over to GIDefender’s house for some
testing. We wired it all up with
alligator clips and tape to see if it’d work.
It was a failure. Not a HUGE
failure, but it took over 2 minutes to satisfactorily flock a head and there
was a lot of fussing to ensure decent coverage.
This device clearly needed a GUY solution – MORE POWER! So I hooked up the two 12VDC generators in
parallel, half expecting something to ignite or melt. Nope.
It worked great! The next test
head flocked in a lot less time and looked a lot better, too! We decided to go back online and order a 110V AC negative ion generator (again, from some guy in
China) in order to get more power.
The
initial solution was not satisfactory, unfortunately. I ordered two 12VDC Negative Ion Generators
on Ebay from “bellevue2046” in China. They were advertised as some goofy kind of
“Anion” generator. I have no Earthly
idea why someone from China would think these have anything to do with onions,
but no matter – it was just what we were needed. After they arrived, I took my Tupperware
device over to GIDefender’s house for some
testing. We wired it all up with
alligator clips and tape to see if it’d work.
It was a failure. Not a HUGE
failure, but it took over 2 minutes to satisfactorily flock a head and there
was a lot of fussing to ensure decent coverage.
This device clearly needed a GUY solution – MORE POWER! So I hooked up the two 12VDC generators in
parallel, half expecting something to ignite or melt. Nope.
It worked great! The next test
head flocked in a lot less time and looked a lot better, too! We decided to go back online and order a 110V AC negative ion generator (again, from some guy in
China) in order to get more power.
Now that GIDefender’s flocker
was successfully up and running, it was my turn to use the leftover odds and
ends to make myself a portable version of the Flockmaster
2000. Since mine was
the “proof of concept” prototype, I figured I’d call it the “Flockmaster 2000-P,” with the P for “prototype” (or perhaps
the P was for “portable”). Either
way, I liked the sound of it.
 I
liked the Tupperware and decided to use it for my final product, with a little
tweaking here and there. I only envisioned
myself doing an occasional noggin or repair; I wasn’t planning to do much
flocking, so didn’t need “industrial grade.”
On the other hand, I needed it to be safe and convenient; yes, this fake Tupperware container
was the answer. It’d carry/store all
of the necessary equipment and keep it in one place. Compact.
Portable.
At left is a pic of the final device
after I’d made my modifications. None of
the mods were conceptually necessary and none were a substantial departure from
the “proof of concept” device; the changes were more in the nature of
refinements to the design than anything.
As shown, it’s complete.
I
liked the Tupperware and decided to use it for my final product, with a little
tweaking here and there. I only envisioned
myself doing an occasional noggin or repair; I wasn’t planning to do much
flocking, so didn’t need “industrial grade.”
On the other hand, I needed it to be safe and convenient; yes, this fake Tupperware container
was the answer. It’d carry/store all
of the necessary equipment and keep it in one place. Compact.
Portable.
At left is a pic of the final device
after I’d made my modifications. None of
the mods were conceptually necessary and none were a substantial departure from
the “proof of concept” device; the changes were more in the nature of
refinements to the design than anything.
As shown, it’s complete.
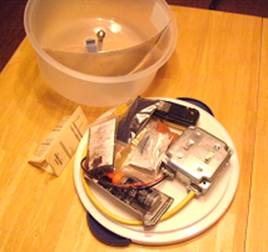 Inside
the container, it holds the flocking materials, glue, the high-voltage negative
ion generator (enclosed in the silver colored switch box) and a few other odds
and ends. All that’s needed is some time
and some noggins to flock. [Confession: ok, I neglected to put in the paintbrushes
with which to apply the glue, the wooden dowel head-post, and the sliver of
wood I used to rearrange the flocking material on the metal ground plate, but
there’s plenty of room for them and I’m too lazy to add them and take another
picture just because of those not being in the pic. You get the idea.]
Inside
the container, it holds the flocking materials, glue, the high-voltage negative
ion generator (enclosed in the silver colored switch box) and a few other odds
and ends. All that’s needed is some time
and some noggins to flock. [Confession: ok, I neglected to put in the paintbrushes
with which to apply the glue, the wooden dowel head-post, and the sliver of
wood I used to rearrange the flocking material on the metal ground plate, but
there’s plenty of room for them and I’m too lazy to add them and take another
picture just because of those not being in the pic. You get the idea.]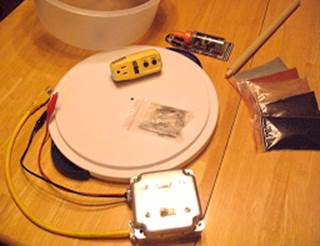 In
the midst of set-up, you can see the yellow Ground Fault Circuit Interrupter
(you can’t be too safe) as well as the Negative Ion Generator (that’s really
fun to say!) and bags of flocking (from Flockit! online)
in each of the Joe hair colors as well as a salt’n’pepper
grey. I asked if they had white, but
they don’t. I figured I could mix the
white with any other color to make my own blend of salt ‘n’ pepper in the
density I wanted, but no such luck.
Hopefully I’ll find a source of white hair somewhere (white would make a
cool Race Bannon from Johnny Quest, too!).
In
the midst of set-up, you can see the yellow Ground Fault Circuit Interrupter
(you can’t be too safe) as well as the Negative Ion Generator (that’s really
fun to say!) and bags of flocking (from Flockit! online)
in each of the Joe hair colors as well as a salt’n’pepper
grey. I asked if they had white, but
they don’t. I figured I could mix the
white with any other color to make my own blend of salt ‘n’ pepper in the
density I wanted, but no such luck.
Hopefully I’ll find a source of white hair somewhere (white would make a
cool Race Bannon from Johnny Quest, too!).
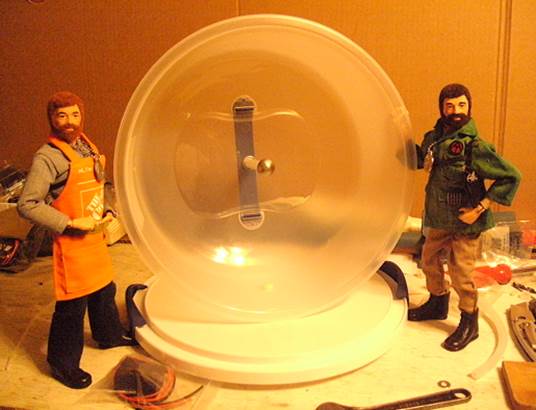
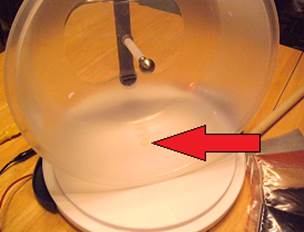 Anyway,
to assemble the device for use, I put a ¼ inch hole in the side of the cake lid
and a matching hole in the base (I did this early on, when I realized it’d be
simpler than the complicated base in my original design). Through these holes, I put a nylon bolt to
secure the lid sideways on the base (indicated by the big red arrow in the
pic).
Anyway,
to assemble the device for use, I put a ¼ inch hole in the side of the cake lid
and a matching hole in the base (I did this early on, when I realized it’d be
simpler than the complicated base in my original design). Through these holes, I put a nylon bolt to
secure the lid sideways on the base (indicated by the big red arrow in the
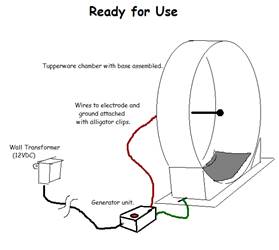
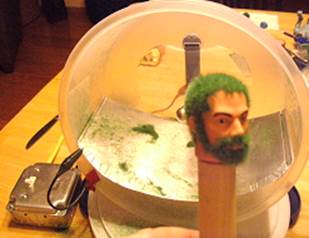
pic). 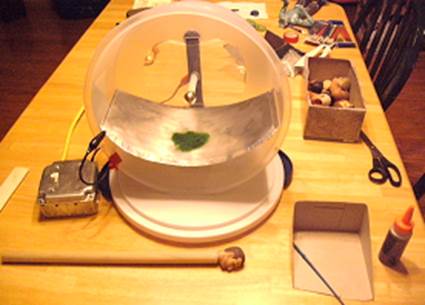 Here’s
the Flockmaster 2000-P, all set up and ready to flock. The lid is attached to the base with the
nylon bolt, the
Here’s
the Flockmaster 2000-P, all set up and ready to flock. The lid is attached to the base with the
nylon bolt, the  negative
ground plane is resting in the flocker (it’s not attached, it’s simply bent into place and remains there by
friction). The negative ion generator
(in the silver switch box) is attached.
The red (+) wire goes to the flocking chamber’s center electrode (you
can see it through the lid) and the black (-) goes to the ground plane (which
is a piece of scrap aluminum from the garage – I think it was part of a stereo
or radio chassis; I cut a rectangle out of the aluminum figuring it’d come in
handy someday). Near the black wire you
can see a piece of red tape; that just takes stress off the wire and serves no
other purpose. On the ground plane is a
little pile of green grass. GIDefender gave me some leftover grass for experimentation
so I wouldn’t have to waste the (more expensive) flocking. In the foreground is the dowel with a noggin
attached. I put the dowel on a bench
sander to reduce the diameter to head-post size and it holds the noggin by
friction. At the lower right is a piece
of a Kleenex box, a paintbrush, and Elmer’s “Glue-All Max” glue. This is where I’ll slop the glue on the
noggin immediately before turning on the flocker and
making him a fuzzhead. You’ll also notice the wooden sliver I use
to rearrange the pile of flocking at the left in the picture – it looks like a
wooden ruler (it’s just a little piece of junk wood from my tablesaw’s
scrap box). The generator (silver box)
is plugged into the GFCI outlet that is, in turn, plugged into a 3-wire
grounded extension cord. I’ll need to
cut a little bit off the neck-post dowel and little wooden fuzz rearranger so they’ll fit in the container, but that’ll
only take a second.
negative
ground plane is resting in the flocker (it’s not attached, it’s simply bent into place and remains there by
friction). The negative ion generator
(in the silver switch box) is attached.
The red (+) wire goes to the flocking chamber’s center electrode (you
can see it through the lid) and the black (-) goes to the ground plane (which
is a piece of scrap aluminum from the garage – I think it was part of a stereo
or radio chassis; I cut a rectangle out of the aluminum figuring it’d come in
handy someday). Near the black wire you
can see a piece of red tape; that just takes stress off the wire and serves no
other purpose. On the ground plane is a
little pile of green grass. GIDefender gave me some leftover grass for experimentation
so I wouldn’t have to waste the (more expensive) flocking. In the foreground is the dowel with a noggin
attached. I put the dowel on a bench
sander to reduce the diameter to head-post size and it holds the noggin by
friction. At the lower right is a piece
of a Kleenex box, a paintbrush, and Elmer’s “Glue-All Max” glue. This is where I’ll slop the glue on the
noggin immediately before turning on the flocker and
making him a fuzzhead. You’ll also notice the wooden sliver I use
to rearrange the pile of flocking at the left in the picture – it looks like a
wooden ruler (it’s just a little piece of junk wood from my tablesaw’s
scrap box). The generator (silver box)
is plugged into the GFCI outlet that is, in turn, plugged into a 3-wire
grounded extension cord. I’ll need to
cut a little bit off the neck-post dowel and little wooden fuzz rearranger so they’ll fit in the container, but that’ll
only take a second.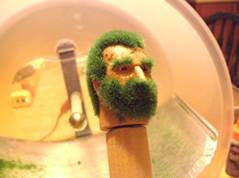 It
worked great! Although we’d played with
different distances between electrode and ground plane at GIDefender’s
house, I’d left the ground plane with him for his Flockmaster
2000… this was a new piece of metal that was a different length, width,
thickness, and shape. But it worked
fine! As you can see on the test head
(at right), I wasn’t careful enough with my glue on the beard and it was far
thicker than I intended, but it sure worked!!!
This was a 21C noggin with melt marks and paint on the poor guy’s
forehead and cheeks. Not a good head,
but a great one for testing purposes.
It
worked great! Although we’d played with
different distances between electrode and ground plane at GIDefender’s
house, I’d left the ground plane with him for his Flockmaster
2000… this was a new piece of metal that was a different length, width,
thickness, and shape. But it worked
fine! As you can see on the test head
(at right), I wasn’t careful enough with my glue on the beard and it was far
thicker than I intended, but it sure worked!!!
This was a 21C noggin with melt marks and paint on the poor guy’s
forehead and cheeks. Not a good head,
but a great one for testing purposes.
 The
next head I did was a CC skinhead Joe. I
was more judicious with the glue and it worked much better. At this rate, it
ought to be easy and quick to flock Joe heads for real. This model railroad grass is longer than Joe
hair from Flockit! but it,
too, worked well for testing. I confess
there’s also a “knack” to getting it on evenly.
Fortunately, it’s easy to pick up.
We learned that touching the noggin dowel to the center electrode REALLY
ramps this device into turbo overdrive!
It also makes the hair on your arms and neck stand up, and tends to make
flocking fly everywhere, but it worked great!
I’m not sure how SAFE touching the noggin dowel to the center electrode
is, but it was fun!
The
next head I did was a CC skinhead Joe. I
was more judicious with the glue and it worked much better. At this rate, it
ought to be easy and quick to flock Joe heads for real. This model railroad grass is longer than Joe
hair from Flockit! but it,
too, worked well for testing. I confess
there’s also a “knack” to getting it on evenly.
Fortunately, it’s easy to pick up.
We learned that touching the noggin dowel to the center electrode REALLY
ramps this device into turbo overdrive!
It also makes the hair on your arms and neck stand up, and tends to make
flocking fly everywhere, but it worked great!
I’m not sure how SAFE touching the noggin dowel to the center electrode
is, but it was fun!
 On
a whim, I decided to use some Sculpy to make a new
green brain for Round 2’s “Dr. Evil.” I
plunked the clay into his brain bucket and made a semblance of a green Sculpey brain. I
cooked it for 15 minutes to harden, then when it cooled, I flocked it. I never bought into the whole legend of
Captain Action, but really like the new Round 2 figures and the Dr Evil. To me he’s more like a generic space alien
than any kind of super-vilian. And with flocked hair he looks like a really
GROOVY space alien!
On
a whim, I decided to use some Sculpy to make a new
green brain for Round 2’s “Dr. Evil.” I
plunked the clay into his brain bucket and made a semblance of a green Sculpey brain. I
cooked it for 15 minutes to harden, then when it cooled, I flocked it. I never bought into the whole legend of
Captain Action, but really like the new Round 2 figures and the Dr Evil. To me he’s more like a generic space alien
than any kind of super-vilian. And with flocked hair he looks like a really
GROOVY space alien!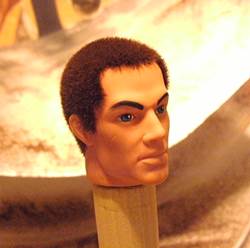 Next
I got out the REAL Joe flocking that I purchased from flockit.com. The first “real” noggin I tried was a
Classic Collection skinhead Joe. I used a paintbrush to paint on the glue
where I wanted the hair to land, and quickly flipped on the FlockMaster
2000-P. The fuzz on the ground plane
cackled and stood up straight, with some jumping immediately onto the center
electrode. Between the electrode and
ground plane I slowly moved the CC noggin.
Within seconds the static charge built up and fuzz started leaping like
miniature spears onto the glue-covered noggin.
I rotated the head to ensure even coverage. In less than a minute and a half, the head
was fully flocked!
Next
I got out the REAL Joe flocking that I purchased from flockit.com. The first “real” noggin I tried was a
Classic Collection skinhead Joe. I used a paintbrush to paint on the glue
where I wanted the hair to land, and quickly flipped on the FlockMaster
2000-P. The fuzz on the ground plane
cackled and stood up straight, with some jumping immediately onto the center
electrode. Between the electrode and
ground plane I slowly moved the CC noggin.
Within seconds the static charge built up and fuzz started leaping like
miniature spears onto the glue-covered noggin.
I rotated the head to ensure even coverage. In less than a minute and a half, the head
was fully flocked!

 I
thought it came out REALLY well, so decided to try a bearded Joe next. I
scrounged in my junk box and unearthed an old Cotswold Elite “Jake” head with a
5 o’clock shadow. This one’s ”shadow” only covered one side of his face
(manufacturing error), so I couldn’t use it anyway. [Incidentally, Cots replaced the head for
free and told me to keep the defective one; nice folks at Cots, and I like
doing business with them.] I painted the
area I wanted to flock, so there wouldn’t be any flesh color showing anywhere,
and after it dried, I painted on the glue where I wanted the flocking to
go. Then into the FlockMaster
2000-P it went. This one took longer
than the beardless CC Joe, as I had more angles to cover. It also took longer, I believe, because I
didn’t remove the head and put it on the wooden neck-post like I’d done with
the CC Joe head. The plastic body really
picked up static, and this one made flocking blast everywhere. I had flocking on my hands, forearms, all
over the floor. It was a good thing my
wife wasn’t home for this one, or she’d have become a whirling tornado! Next time I’ll remove the head and put it on
the wooden dowel neck post. Anyway, it
seemed the side closest to the ground plane got the best coverage, so I had to
roll the noggin around and angle it so it’d get the flocking quickly onto all
of the contours of chin, under the jaw line, etc, as well as the noggin itself. For this pic at left, I stepped out onto the
back patio, in an effort to avoid the yellowish tint in my photos caused by my
kitchen’s fluorescent lights. It came
out really well, I think. Plus it let me
resurrect a formerly useless head and turn it into a groovy new member of the
Adventure Team. Give the guy brown
trousers, a short-sleeved camo shirt, machete, French canteen, British #5
rifle, and Viola! He’s become the Elite
Brigade’s Liaison Officer to the Adventure Team!
I
thought it came out REALLY well, so decided to try a bearded Joe next. I
scrounged in my junk box and unearthed an old Cotswold Elite “Jake” head with a
5 o’clock shadow. This one’s ”shadow” only covered one side of his face
(manufacturing error), so I couldn’t use it anyway. [Incidentally, Cots replaced the head for
free and told me to keep the defective one; nice folks at Cots, and I like
doing business with them.] I painted the
area I wanted to flock, so there wouldn’t be any flesh color showing anywhere,
and after it dried, I painted on the glue where I wanted the flocking to
go. Then into the FlockMaster
2000-P it went. This one took longer
than the beardless CC Joe, as I had more angles to cover. It also took longer, I believe, because I
didn’t remove the head and put it on the wooden neck-post like I’d done with
the CC Joe head. The plastic body really
picked up static, and this one made flocking blast everywhere. I had flocking on my hands, forearms, all
over the floor. It was a good thing my
wife wasn’t home for this one, or she’d have become a whirling tornado! Next time I’ll remove the head and put it on
the wooden dowel neck post. Anyway, it
seemed the side closest to the ground plane got the best coverage, so I had to
roll the noggin around and angle it so it’d get the flocking quickly onto all
of the contours of chin, under the jaw line, etc, as well as the noggin itself. For this pic at left, I stepped out onto the
back patio, in an effort to avoid the yellowish tint in my photos caused by my
kitchen’s fluorescent lights. It came
out really well, I think. Plus it let me
resurrect a formerly useless head and turn it into a groovy new member of the
Adventure Team. Give the guy brown
trousers, a short-sleeved camo shirt, machete, French canteen, British #5
rifle, and Viola! He’s become the Elite
Brigade’s Liaison Officer to the Adventure Team!
Glue: http://www.elmers.com/product/detail/E9406?filterPath=hardware
Flocking: http://www.flockit.com/index.php/gi-joe-flocking-1-2-oz.html
(note, on the Flock-it! Site, you’ll need to search for “gi
joe” to find it, or use my direct link above.)
Home Depot or Lowe’s for wiring supplies, threaded rod, lamp finial.
Hardware store for irrigation pipe/tubing.
Wal-Mart for cake carrier.
Negative Ion Generator: They’re
available online, but I found Ebay was my best bet.
Heads: for a variety of heads (other
than vintage, ME, TC, 40th, CC, etc) try Cotswold at: http://www.gijoeelite.com/f_bodyParts1.asp?BodyPart=ALL ($2.99.
$8.99 already flocked!)
IMPORTANT NOTE: This uses high voltage and is not UL listed. It is a dangerous device. If you build one you may die. Do not build a device like this. I am not responsible for any injury, loss, or damage that may occur from your potential attempt to construct a device such as this. Do so at your own risk, after ensuring that your will and insurance policies are all in order. DON'T BUILD ONE!!!
Click the logo to go home ![]()